Floating laminate floors add great value, like hardwood floors, and are easy to install. Many people who have no idea about floating floors will get detailed information in this guide.
A floating floor is drifted on its top beneath it and isn’t straightforwardly attached to the floor without using nails and gum. It is placed down or gotten around the room corners.
Various types of floating laminate floors are available from which you can make a selection. Types of floating floors include laminate floors, some engineered hardwoods, a few pieces of vinyl, etc.
If you also want such floors but don’t have any idea about the installation, you are in the right place. We will accommodate you with some easy steps which will be uncomplicated for you to follow.
Let’s begin with the guide.
How to set up Floating Laminate Flooring.
- Prepare the subfloor at least 48 hours before installing the floating laminate floor and level the floor with the underlayment.
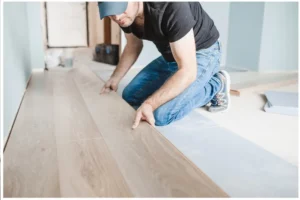
- Wear all the protective gear and install the laminate planks from the first row at the end of the room towards the outer door. Use click-lock technology to fix all the planks.
- Give a finishing touch by removing the spacer and filling the gap with a compressible PE 3/8-inch to protect the floating laminate floors.
Complete Method to Install Floating Laminate Flooring
Before starting the installation, you need a few tools and materials needed in this regard.
The tools used to install floating laminate flooring are a tape measure, jigsaw, caulk gun, oscillating saw, etc.
On the other hand, materials used for this purpose include flooring underlayment, silicon sealant, floor spacers, Pergo laminate flooring, etc.

Now, let’s start the process.
 Prepare the Floor
 Prepare the Floor
To prepare the floor, you need to create a subfloor first but make sure to place the room flooring approximately 48 hours before the installation to adjust the temperature.
The floors should be untidy and smooth so that the floor installation is easy for you. Preparing the floor requires a few steps that are:
Level the Floor
The floor where you are going to begin the installation should be leveled. You can level it by using an instrument.
If the subfloor is leveled, the flooring will last long. If there are many low and high spots on the floor, don’t ignore them. You may hire a professional in this regard.
Lamination
You need an underlayment material to begin the lamination to undercut the door frame. The underlayment is a material that is used for floor installation.
To install the laminate floor, you must need this material. Sometimes they are already fixed, but in case you need to install them, go ahead and don’t skip them.
You can ask experts to install them on your floors.
Add Spacers
A spacer is also known as a holding chamber. They are specifically used for gap purposes when you begin the floor installation.
Usually, you don’t need to buy them as they come with flooring, but you can also create them with plywood by cutting them into equal parts. Now for the expansion gap, you need spacers.
Make sure that you have placed them with an equal gap. Once you have installed it, use a tap to fix them, so they don’t move during the floor installation.
Measure the Room
To get an idea of how much flooring you need for your room, measure the width and length.
After measuring, add 10% more in case any issue occurs and can be solved easily. You can also use a flooring calculator for this purpose.
Add Floor Plank
When you begin the installation, always go from left to right. Furthermore, to make the floating floors durable, you need to lay down the floor plank, which should be undamaged.
Floor planks are made of various elements, including fungicides, and are used to make the flooring durable.
Begin the Installation
Now you have prepared the flooring by adding all the important elements; it’s time to begin the installation process.
It also requires a few steps to follow.
-
Start with the Layout
To get a perfect template design for your floors, you should mix the planks from different cartons to get different colors and shades.
Start from the first row and keep adding. Ensure that you are wearing safety glasses and gloves during the entire process for your protection.
In every plank, there is a thin material on both ends. One of the ends is known as the tongue, while the other end is known as the groove.
You need to cut long pieces of the tongue to add them to the floors. Also, cut the short piece to attach them to the corners.
-
Start the Second Row
Now begin the second row and place the tongue side of the plank against the wall. Ensure that there must be a 6 inches gap before placing them. You can cut the pieces by using an oscillating saw.
-
Click Lock Flooring
You might have noticed that a few floors have click-lock flooring which is a new option. They are not real but they are made in a way that they look real.
They are designed from wood boards and are wrapped in paper or prints. If your floor has also this option, you can easily install the floor by placing the tongue into the grove.
-
Repeat the Process
For other planks, repeat the same process and keep repeating until every end is fixed and placed. Ensure that while placing the planks, don’t forget to cover the ends with a heavy plank so that the plank’s pieces remain in their place.
-
Install Floating Laminate Floor
Now begin the installation process without using any nail or other item. Laminate floor installation is not uncomplicated. You need to assemble all the rows in this regard.
Start from the first row and keep repeating until the last one. To close the joints use a hammer and at least keep an 8-inch distance from the plank end so that the floor doesn’t get damaged.
When you reach the last row, you might need to cut some pieces in order to adjust it. Take the proper measurement and later cut according to it.
-
Lock the Last Row
Use a pull bar and lock the last row. It is how you are done with the floor installation successfully.
Finishing the Floor
-flat-andi-nur-abdillah.png) Finishing the Floor
Finishing the Floor
Now, you are left with some finishing touch. The steps for finishing include:
Remove the Spacer
There should not be any spacer in the room. Remove them asap.
-
Fill the Gap
If there is an expansion gap in the room fill them by using compressible PE 3/8-inch for protection.
Apply Silicon
To fix all the edges use silicon. Make sure that you have applied it accurately. You are all done.
Pros and Cons of Floating Laminate Floors
Let’s have a look at a few pros and cons of laminate flooring floors.
Pros
Some of the floating laminate floor benefits include:
They are Inexpensive
They are relatively inexpensive than other floors. So, if you don’t want to spend a lot, go for them. As they are budget-friendly you can save a lot.
They are DIY-Friendly
You can install these floors yourself without contacting any professional. The entire process is mentioned above.
Easily Replaced
They are not attached to the subfloor so you can replace them easily without any difficulty.
Cons
Common floating floor problems include:
Difficult to Refinished
Unfortunately, once you have finished the floor, it will be difficult to refinish. However, if you use the right wood or material they might last longer.
Create Noise
When you walk over the flooring floor they create noise and you might feel hollow.
FAQs – Frequently Asked Questions
Which Way Should the Floating Floor be Laid?
In general, you should lay the floating floor in the direction of the light source in this particular room. If you have multiple ways to get into the room, then you should lay these flooring options at your convenience.
Where Do You Start when Installing a Floating Floor?
It is better to start from one corner of your room and lie down on all the planks till the end. It should be on the side facing the wall and install the longest wall in the room at the very end.
Does the Floating Floor Need Underlayment?
It depends on the material that is used for the construction of the floating floor. Usually, the laminate and engineered floating floors need the underlayment setup for their better performance and functionality.
What is Better 8mm or 12mm Laminate?
The 12 mm laminate is more durable and impact resistant than 8 mm planks. It is also recommended for high-traffic areas and will last longer on any type of surface.
How Do You Lay a Floating Laminate Floor?
You don’t need any adhesive material or staples for these tiles. You can install them at any place with foam sheet padding for more comfort and durability. Which way should the floating floor be laid?
Conclusion
Floating laminate floors are a great way to add value to your room. If you don’t want to spend a lot on the flooring or want to install it yourself, there is nothing better than a floating floor.
With the right material and things, you can make these floors durable. Most importantly, the subfloor that you will prepare should be durable so that it gives the right support to your floor.
If you plan to install the floor anytime soon, this article will give you detailed instructions step by step. Hope you will find it helpful and it might help you to get the floating laminate floors.
Leave a Reply